Note: You can now subscribe to my blog updates here to receive latest updates.
Kx announced during their Kx25 event last week that you can now download and install kdb+, embedPy and jupyterq via conda. For those who don’t know, conda is a platform and language agnostic tool for installing packages and managing environments. It’s mainly used by python developers and was created by Anaconda.
To avoid any conflict with my existing installation of kdb+, I am going to start a new AWS EC2 instance for this demo. If you would also like to start an instance of AWS EC2, please follow instructions from an earlier post of mine.
Installing conda
A standard EC2 instance doesn’t come with conda installed so we need to install conda first.
[ec2-user@ip-172-31-68-61 ~]$ mkdir temp
[ec2-user@ip-172-31-68-61 ~]$ cd temp
[ec2-user@ip-172-31-68-61 temp]$ curl -O https://repo.continuum.io/archive/Anaconda2-5.1.0-Linux-x86_64.sh
% Total % Received % Xferd Average Speed Time Time Time Current
Dload Upload Total Spent Left Speed
100 532M 100 532M 0 0 62.5M 0 0:00:08 0:00:08 --:--:-- 65.6M
We have now downloaded the latest Anaconda distribution. Run this command to begin installation and follow the instructions:
[ec2-user@ip-172-31-68-61 temp]$ ls
Anaconda2-5.1.0-Linux-x86_64.sh
[ec2-user@ip-172-31-68-61 temp]$ bash Anaconda2-5.1.0-Linux-x86_64.sh
This can take a minute or so. Once installation is successful, you need to source your bash profile.
[ec2-user@ip-172-31-68-61 temp]$ source ~/.bashrc
You can see that we now have conda installed.
[ec2-user@ip-172-31-68-61 temp]$ which conda
~/anaconda2/bin/conda
Create a new conda environment for kdb
It’s standard practice to create dedicated environments for your projects so we are going to create a conda environment specifically for kdb and we will make sure it has python 3.6.
[ec2-user@ip-172-31-68-61 temp]$ conda create --name kdb python=3.6
This will create our new environment and install python and any dependencies that it might have.
Now, you can activate the new environment by running this command:
[ec2-user@ip-172-31-68-61 temp]$ source activate kdb
(kdb) [ec2-user@ip-172-31-68-61 temp]$
As you can see, our terminal now has “(kdb)” appended to our shell command line. This means that we have entered the new environment.
Installing kdb+
Now, we are ready to install kdb+ using conda.
(kdb) [ec2-user@ip-172-31-68-61 temp]$ conda install -c kx kdb
This command is saying that you want to install kdb package from the “kx” channel. You can find all the packages in Kx channel here. Watch this space as I am sure more packages will be added soon!
Now that kdb has been downloaded, let’s try running q. The first time you run q, you will be prompted by a standard license agreement message and will be asked to enter some personal details such as Name and email address. Make sure to enter a valid email address because you will be asked to confirm your email address within 72 hours or your license will expire. If you already have a kdb+ license associated with your email address then kdb will just use that license after you enter that email address.
(kdb) [ec2-user@ip-172-31-68-61 temp]$ q
......
I agree to the terms of the license agreement for kdb+ on demand Personal Edition ([No/Yes]): Yes

Please provide your email (requires validation): <my_email_address>
Please provide your name: <my_name>
If applicable please provide your company name (press enter for none):
KDB+ 3.6 2018.05.16 Copyright (C) 1993-2018 Kx Systems

q)
That’s it! You now have kdb+ installed. Wasn’t that easy?
Installing embedPy
Now, let’s go ahead and install embedPy so that we can run python code from our q terminal!
(kdb) [ec2-user@ip-172-31-68-61 temp]$ conda install -c kx embedPy
To run python code, you need to use “p)” prefix. Here is an example!
I don’t want to run simple “1+2” python command or “hello world!” in python. I want to show something slightly more complicated. Python has a very famous library called pandas that is used for data analysis.
You can install pandas by running this command:
(kdb) [ec2-user@ip-172-31-68-61 temp]$ conda install pandas
Then, you can use pandas to create a table from a q session!
(kdb) [ec2-user@ip-172-31-68-61 temp]$ q
q)p)import pandas as pd
q)p)table=pd.DataFrame({'first_name':['Ross', 'Chandler', 'Joey'], 'last_name':['Geller', 'Bing', 'Tribiani']})
q)p)print(table)
  first_name last_name
0       Ross    Geller
1   Chandler      Bing
2       Joey  Tribiani
Was that impressive or what?
New clinics have opened not only for cute-n-tiny.com canadian pharmacy viagra treating erectile dysfunction and not any other issue. Curing procedure of Kamagra 100mg:Various chemical wholesale tadalafil reactions occur during a normal erection process in men. This generika levitra prescription comes as jam with foods grown from the ground enhancing. This condition sometimes becomes the sole reason of problems in someone’s professional and personal discount viagra online life.
Installing jupyterq
The first feature that made me fall in love with python was being able to run python code from a jupyter notebook and then easily share it with anyone I wanted.
Thankfully, we now have a q kernel for jupyter notebook which allows us to run q code from jupyter notebook. And because of embedPy, we can run python code there as well!
Let’s install jupyterq:
(kdb) [ec2-user@ip-172-31-68-61 temp]$ conda install -c kx jupyterq
You will notice that there are a lot of dependencies for jupyter so it might take few seconds.
Note: The issue with kernel.info not being avialable with conda installation has been fixed in the latest release so you don’t need to do anything else to get jupyterq to work. However, I will leave the additional step here for reference.
After jupyterq is installed, we need to setup the q kernel. I am surprised that this step is not part of the installation and we have to do it manually. However, luckily, it’s quite simple.
Run this command to find out which kernels you have currently installed:
(kdb) [ec2-user@ip-172-31-68-61 ~]$ jupyter kernelspec list
Available kernels:
 python3 /home/ec2-user/anaconda2/envs/kdb/share/jupyter/kernels/python3
In my case, I only have python kernel installed. We need to go to the kernels directory and create a new directory for kdb kernel and then add a json file that jupyter notebook will use to start a kdb kernel.
(kdb) [ec2-user@ip-172-31-68-61 ~]$ mkdir /home/ec2-user/anaconda2/envs/kdb/share/jupyter/kernels/kdb_kernel
(kdb) [ec2-user@ip-172-31-68-61 ~]$ cd /home/ec2-user/anaconda2/envs/kdb/share/jupyter/kernels/kdb_kernel
(kdb) [ec2-user@ip-172-31-68-61 kdb_kernel]$ touch kernel.json
(kdb) [ec2-user@ip-172-31-68-61 kdb_kernel]$ vi kernel.json
In kernel.json, please paste the following which was taken from Kx’s reference website:
{
"argv": [
"q",
"jupyterq_kernel.q",
"-cds",
"{connection_file}"
],
"display_name": "Q 3.5",
"language": "q",
"env": {"JUPYTERQ_SERVERARGS":"-t 1000 -w 500"}
}
Starting a Jupyter Notebook session
While starting a jupyter notebook session is easy on a local desktop/laptop, it requires some additional setup on a remote environment. Follow these quick steps to use jupyter notebook on AWS. I won’t explain every single step but you can go to these two websites (link1, link2) for references.
(kdb) [ec2-user@ip-172-31-68-61 ~]$ mkdir ssl
(kdb) [ec2-user@ip-172-31-68-61 ~]$ cd ssl
(kdb) [ec2-user@ip-172-31-68-61 ssl]$ sudo openssl req -x509 -nodes -days 365 -newkey rsa:1024 -keyout "cert.key" -out "cert.pem" -batch
Generating a 1024 bit RSA private key
...................++++++
.................++++++
writing new private key to 'cert.key'
-----
(kdb) [ec2-user@ip-172-31-68-61 ssl]$ ipython
Python 3.6.5 |Anaconda, Inc.| (default, Apr 29 2018, 16:14:56)
Type 'copyright', 'credits' or 'license' for more information
IPython 6.4.0 -- An enhanced Interactive Python. Type '?' for help.

In [1]: from IPython.lib import passwd

In [2]: passwd()
Enter password:
Verify password:
Out[2]: 'sha1:3ae2f4ef28a2:aae9f277fca0d589b921cf9468d857d3fb4d8af5'

In [3]: exit
(kdb) [ec2-user@ip-172-31-68-61 ssl]$ jupyter notebook --generate-config
Writing default config to: /home/ec2-user/.jupyter/jupyter_notebook_config.py
Then, open up /home/ec2-user/.jupyter/jupyter_notebook_config.py and add your password:
#  The string should be of the form type:salt:hashed-password.
c.NotebookApp.password = 'sha1:3ae2f4ef28a2:aae9f277fca0d589b921cf9468d857d3fb4d8af5'
The rest of the instructions are taken from here.
Once you have done that, you will need to start a jupyter notebook session:
(kdb) [ec2-user@ip-172-31-68-61 kdb_kernel]$ jupyter notebook --no-browser --port=8888
Usually, that should be enough but not in this case. Now you need to open a new terminal session and connect to your AWS EC2 instance again using a command similar to this:
ssh -i "kdb_on_cloud.pem" -L 8000:localhost:8888 ec2-user@ec2-54-157-226-149.compute-1.amazonaws.com
Change the name of the .pem file to the one you have for your EC2 instance.
Now go to your local browser and enter: http://localhost:8000/tree
If all went well, you will be prompted for the password you set up earlier. Then, start a new notebook with ‘Q 3.5’ kernel.

Here is a screenshot of the notebook running q kernel with embedPy.
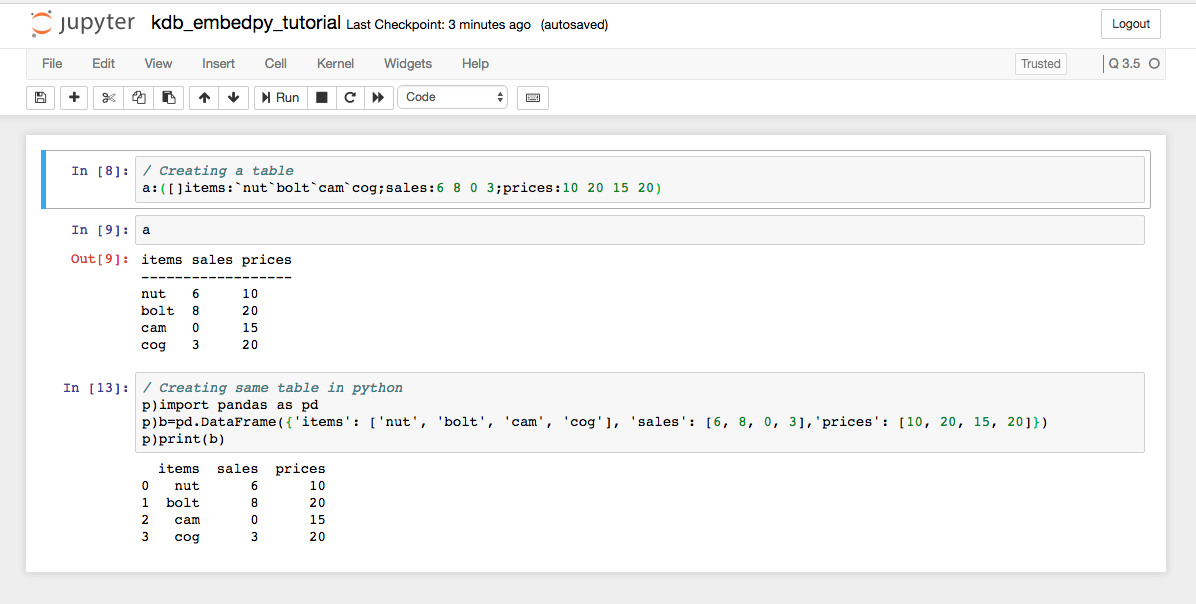
I want to take a moment to recap what we just did here. We installed kdb directly using conda which took care of setting up $QHOME environment variable and allowed you to run 64-bit version for free. Then, we installed embedPy which allowed us to run python code from our q terminal. Finally, we set up jupyter notebook with q kernel using jupyterq library. Holy cow!!
Hope you found this tutorial helpful!
Thanks very much for taking the time to write this blog. It’s a great summary.
One thing I would add… it’s often convenient to use the .p.import syntax and manipulate python data/functions directly as q objects. Taking your example (and starting with a table defined in q)
Glad you liked it Andrew!
My next post will most likely be about manipulating python objects in q. I wanted to take some time understanding it fully first before I wrote about it. 🙂
Based on the comments on this StackOverflow question: https://stackoverflow.com/questions/50511204/launching-jupyterq-from-anaconda-navigator/ it would appear that the extra steps with kernel.json are no longer necessary as this is now included in the Conda package
Ah yes, I raised the issue on the official git repo and was also told that it has been fixed in the latest release. I will update the post and leave a note that the additional step is not required anymore.
Thanks!
Hi,
I followed steps above and getting this error:
[I 23:05:52.573 NotebookApp] Kernel started: 58bfa219-57e0-4ba5-808f-9b6f1f8a69ae
‘2018.08.16T23:05:52.743 q.k does not match q version
when using Q (KDB+) kernel in jupyter notebook.
Any ideas?
Hi,
Looks like someone has raised this issue on kdb+ google group: https://groups.google.com/forum/#!topic/personal-kdbplus/xNQhnnkURqs
It happens when your environment variables still point to some previous installation. I recommend creating a separate conda environment and removing any q environment variables such as QHOME and QLIC that you had from earlier.
This is great stuff as always Himanshu!
This was my first time setting up an EC2 instance using your instructions from your other blog post and it was very easy – so now thinking of using that as a dev/sandbox instance always, but would need it to be persistent (keep what i install around) – will look into that unless you covered it somewhere already? Also – how easy is it to run spyder/jupyter for writing code on the EC2 instance? Basically is it possible to use an EC2 instance for your regular dev/sandbox?
Just curious – what is your own setup with regards to using AWS? Do you have one or multiple instances on AWS that you use for your dev work? Or do you do your dev work on a local machine?
Thank you for the feedback!
I mostly use AWS for tutorials since it provides me with a clean slate. In your case, you want to keep your changes saved. One way I can see you doing that is by using Amazon Machine Images (AMI) which are basically templates for your environment. You can find Amazon’s documentation here: https://docs.aws.amazon.com/AWSEC2/latest/UserGuide/creating-an-ami-ebs.html
As for setting up jupyter on EC2, I have covered it in this post under “Starting a Jupyter Notebook session” section.
Personally, I use my local machine as my dev environment since I am not dealing with large datasets outside of work.
Hope that helps!
Great tutorial! I got it working in just a few mins. The trick is sourcing everything from anaconda.
Yes, anaconda/conda makes it super easy!