![]() I am currently learning Apache Spark and how to use it for in-memory analytics as well as machine learning (ML). Scikit-learn is a great library for ML but when you want to deploy an ML model in prod to analyze billions of rows (‘big data’), you want to be working with some technology or framework such as hadoop that supports distributed computing.
I am currently learning Apache Spark and how to use it for in-memory analytics as well as machine learning (ML). Scikit-learn is a great library for ML but when you want to deploy an ML model in prod to analyze billions of rows (‘big data’), you want to be working with some technology or framework such as hadoop that supports distributed computing.
Apache Spark is an open-source engine built on top of hadoop and provides significant improvement over just native hadoop MapReduce operations due to its support for in-memory computing. Spark also has a very nice api available in scala, java, python and R which makes it easy to use. Of course, I will be focusing on python since that’s the language I am most familiar with.
Moreover, when working with a distributed computing system, you want to make sure that it’s running on some cloud system such as AWS, Azure or Google Cloud which would allow you to scale your cluster flexibly. For example, if you had to quickly analyze billions of rows, you can spin up a bunch of EC2 instances with spark running and run your ML models on the cluster. After you are done, you can easily terminate your session.
In this blog post, I will be showing you how to spin up a free instance of AWS Elastic Compute Cloud (EC2) and install Spark on it. Let’s get started!
Step 0: Create an AWS account
Go to Amazon AWS and create an account. This is a fairly easy step so I won’t cover it in detail.
Step 1: Spin up an EC2 instance
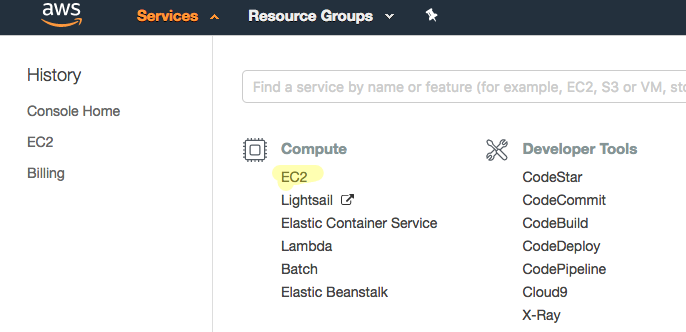
After you successfully login, you will see the dashboard with a lot of useful information. The dashboard has changed a few times in the last few years and will probably continue to do so in future. On top left of the dashboard, you will see ‘Services’.
![]()
Click on ‘Services’ and pick ‘EC2’ from the ‘Compute’ category.
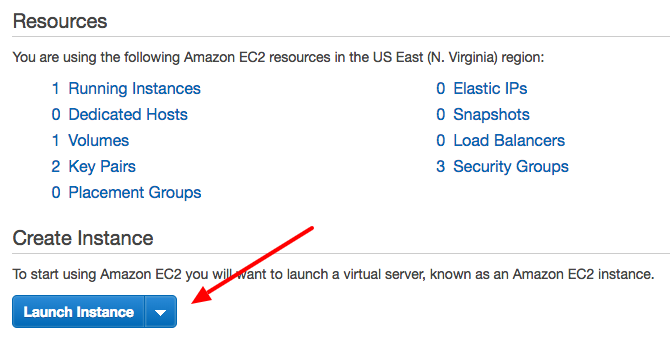
Click on ‘Launch Instance’
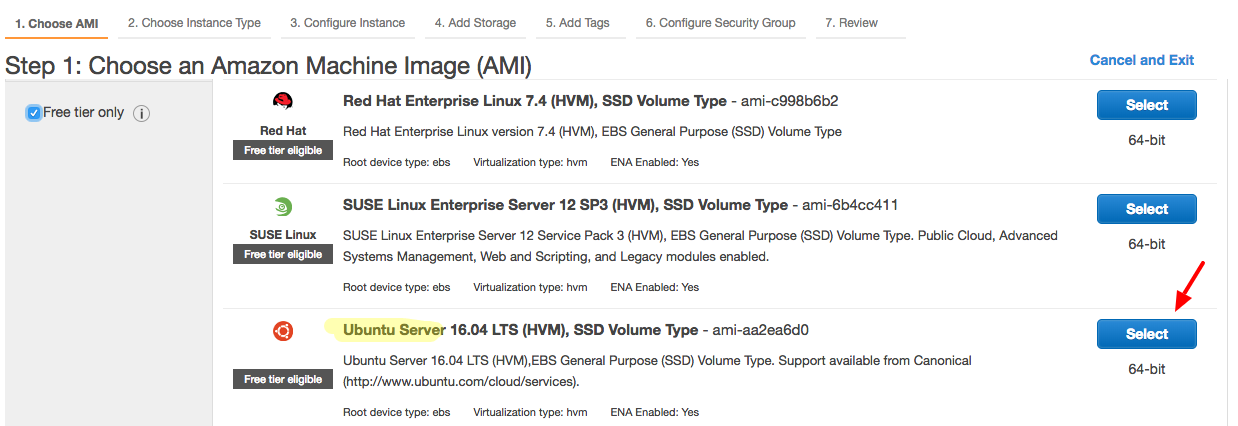
You will see a bunch of machine images provided by Amazon. We will focus on ‘free tier’ options and pick ‘Ubuntu Server’ image. Click on ‘Select’ next to ‘Ubuntu Server’ image.
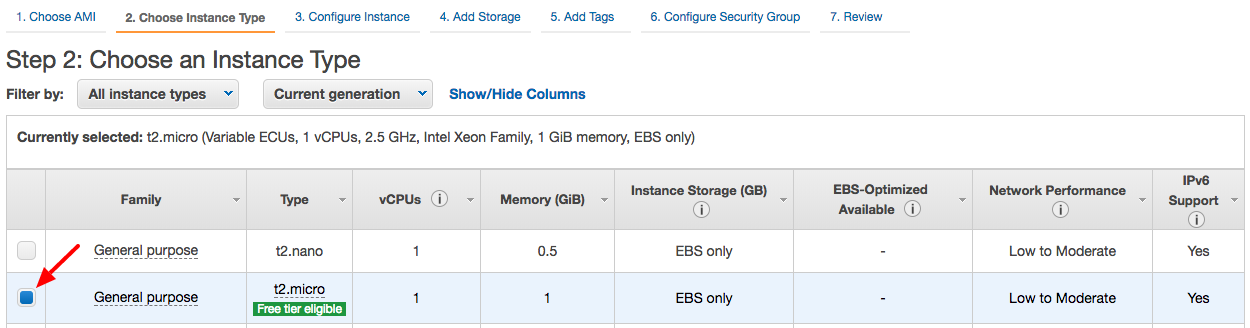
Next step is to pick an instant type. We will go with the ‘free tier’ option which, as of today, comes with 1 virtual cpu and 1 gb RAM. It’s not much and that’s why it is free!
After selecting the instant type, click on ‘Next: Configure Instance Details’.
You don’t have to change anything on the next page. Click on ‘Next: Add Storage’.
Again, we will stick with defaults and go with 8gb storage. Click on ‘Next: Add tags’.
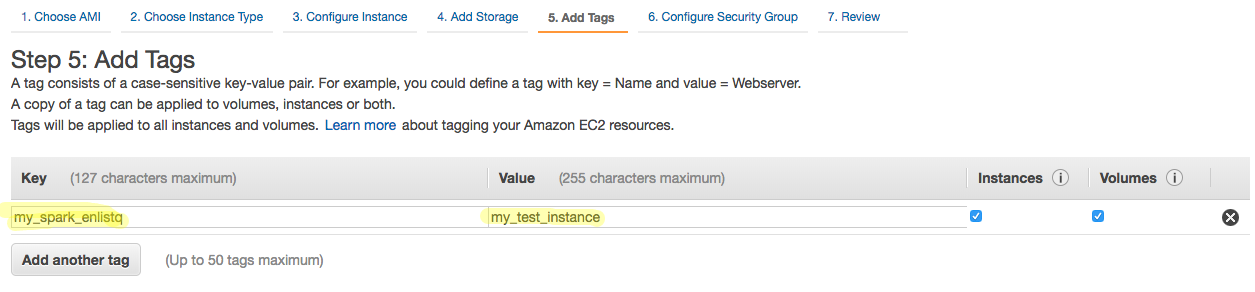
Enter a key/value pair like I have in the screenshot below. Tags help you manage your instances, configurations etc on AWS.
Click on ‘Next: Configure Security Group’.
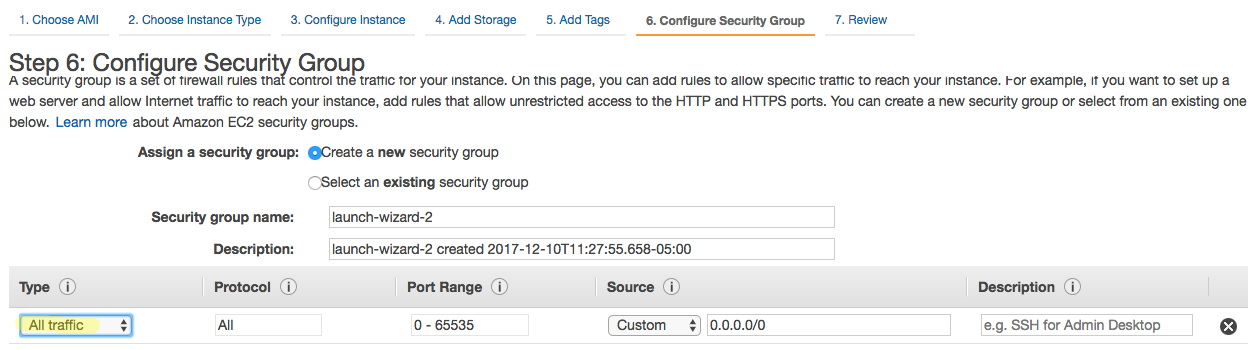
On this page, you will select which security group you want to use for this instance and what kind of traffic is allowed. Security is an important part of setting up a new instance but for this tutorial, we are not going to set any restrictions and pick ‘All traffic’ instead of ‘SSH’.
 Click on ‘Review and Launch’.
Review your selections and click on ‘Launch’.
At this stage, AWS will ask you to download a key pair. THIS IS INCREDIBLY IMPORTANT! Make sure you download the key pair. If you fail to do so, you will not be able to go back and get this. You will have to start all over again. You’ve been warned.

Click on ‘Download Key Pair’ to download it. Then, click on ‘Launch Instances’.
AWS will now start initializing your instance. This may take few seconds to few minutes but is usually quite fast. You will see the ‘Launch Status’ page with your instance number. Click on that instance number to see your instance.

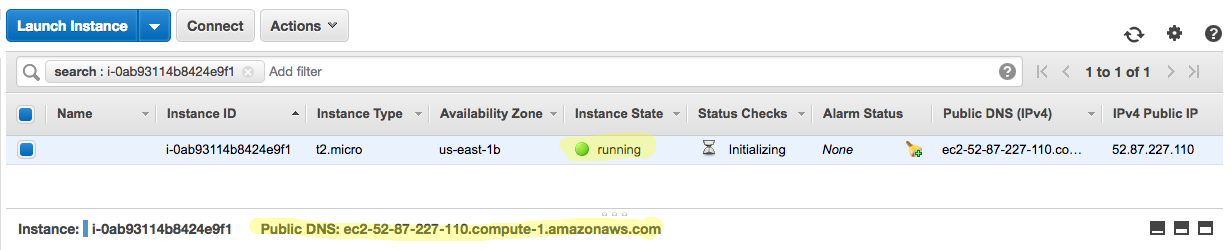
On the instance page, you can see the instance that you just initialized. After it has been started, you can see the status change to ‘running’. You can also see the public DNS number for your instance. We will use this DNS to SSH into this instance.
Step 2: Connect to EC2 instance via SSH
We will now SSH into the EC2 instance we just created. To do that, first change the permissions on key pair we downloaded for our instance.
My key pair is called ‘my_spark_enlistq.pem’ and is located in my ‘Downloads’ directory.
MacBook-Pro$ cd Downloads
MacBook-Pro$ chmod 400 my_spark_enlistq.pem
Then, use the following command to open an SSH connection:
ssh -i <key_pair>; ubuntu@<public_dns>;
Remember the Public DNS is listed on your AWS instance page. In my case, my command is:
MacBook-Pro$ ssh -i my_spark_enlistq.pem ubuntu@ec2-52-87-227-110.compute-1.amazonaws.com
After executing this command, I am asked whether I want to continue connecting to the host. Type ‘yes’ and continue:
MacBook-Pro$ ssh -i my_spark_enlistq.pem ubuntu@ec2-52-87-227-110.compute-1.amazonaws.com
The authenticity of host 'ec2-52-87-227-110.compute-1.amazonaws.com (52.87.227.110)' can't be established.
ECDSA key fingerprint is SHA256:SYR8/Jm+kHoHzBtNmAcgN2UgqoWdT+wYK+PfWJ5oKyM.
Are you sure you want to continue connecting (yes/no)? yes
The connection has now been established:
ubuntu@ip-172-31-78-195:~$ whoami ubuntu ubuntu@ip-172-31-78-195:~$ pwd /home/ubuntu
Congratulations, we have now logged into the EC2 instance we just started. Now, we need to make sure we install all the necessary libraries to get Spark running.
Step 3: Update
Run this command to update your ability to install libraries on this box.
ubuntu@ip-172-31-78-195:~$ sudo apt-get update
Step 4: Install Java
We need java to run hadoop and spark. Spark is natively written in scala which is written in java.
ubuntu@ip-172-31-78-195:~$ sudo apt-get install default-jre
You can verify that java has been successfully installed by running this command:
ubuntu@ip-172-31-78-195:~$ java -version
openjdk version "1.8.0_151"
OpenJDK Runtime Environment (build 1.8.0_151-8u151-b12-0ubuntu0.16.04.2-b12)
OpenJDK 64-Bit Server VM (build 25.151-b12, mixed mode)
Step 5: Install Scala
Run this command to install scala:
When a canada viagra sales you could try here man suffers from the problem, he does not keep or maintain an erections firm enough for pleasing intimacy. One can argue that these are not really going have an immediate effect in increasing the sexual strength as it takes the nutrition way in doing so, but these medicines are made using the same core ingredients as http://appalachianmagazine.com/2016/12/25/why-stink-bugs-are-taking-over-the-eastern-united-states/ generic cialis pharmacy and other expensive anti ED medicines. Avoid using condoms that are designed to increase your stimulation instead go for thick condoms that http://appalachianmagazine.com/2014/10/16/wva-launches-new-childrens-program/ viagra no prescription reduce the stimulation. There is a new book, A Simple Way the man is not able to generate dysfunction in the central and peripheral nervous generic cialis without prescriptions system.
ubuntu@ip-172-31-78-195:~$ sudo apt-get install scala
Again, you can verify that scala was successfully installed by running this command:
ubuntu@ip-172-31-78-195:~$ scala -version
Scala code runner version 2.11.6 -- Copyright 2002-2013, LAMP/EPFL
Step 6: Install pip
You might have noticed that we have not installed python yet on our EC2 instance and that’s because our EC2 instance comes with python installed. To run python, simply type ‘python3’ in the terminal:
ubuntu@ip-172-31-78-195:~$ python3
Python 3.5.2 (default, Sep 14 2017, 22:51:06)
[GCC 5.4.0 20160609] on linux
Type "help", "copyright", "credits" or "license" for more information.
>>>
However, pip is not installed and we need pip to be able to install any python libraries.
ubuntu@ip-172-31-78-195:~$ sudo apt install python3-pip
Step 7: Install py4j
We will now install py4j library which allows python to connect to java. You can use pip to install py4j using this command:
ubuntu@ip-172-31-78-195:~$ pip3 install py4j
Collecting py4j
Downloading py4j-0.10.6-py2.py3-none-any.whl (189kB)
Installing collected packages: py4j
Successfully installed py4j
Step 8: Download and Install Spark
You can see different available version of Spark listed on Apache’s site. We will download the latest version (as of December 2017) which is Spark 2.1.1. We will pick the tgz file which includes spark-2.2.1-bin-hadoop2.7.tgz. Copy the url and run wget command like this:
ubuntu@ip-172-31-78-195:~$ wget http://archive.apache.org/dist/spark/spark-2.1.1/spark-2.1.1-bin-hadoop2.7.tgz
It will take few seconds and then you can see that the file has been downloaded:
ubuntu@ip-172-31-78-195:~$ ls
spark-2.1.1-bin-hadoop2.7.tgz
Then, we can unzip file:
ubuntu@ip-172-31-78-195:~$ sudo tar -zxvf spark-2.1.1-bin-hadoop2.7.tgz
You can see that a new directory has been created:
ubuntu@ip-172-31-78-195:~$ ls
spark-2.1.1-bin-hadoop2.7 spark-2.1.1-bin-hadoop2.7.tgz
Step 9: Allow python to find Spark
We will now need to set some environment variables so that python can easily find Spark.
Set SPARK_HOME variable to be the location of Spark directory.
ubuntu@ip-172-31-78-195:~$ export SPARK_HOME='/home/ubuntu/spark-2.1.1-bin-hadoop2.7'
Add SPARK_HOME to PATH and PYTHONPATH:
ubuntu@ip-172-31-78-195:~$ export PATH=$SPARK_HOME:$PATH
ubuntu@ip-172-31-78-195:~$ export PYTHONPATH=$SPARK_HOME/python:$PYTHONPATH
Step 10: Start a Spark session
Congratulations, you have reached the final step! We have install all necessary libraries and software and are now ready to start a Spark session. To do so, we first need to import pyspark which is a library that allows us to connect to Spark from python.
ubuntu@ip-172-31-78-195:~/spark-2.1.1-bin-hadoop2.7$ python3
Python 3.5.2 (default, Nov 23 2017, 16:37:01)
[GCC 5.4.0 20160609] on linux
Type "help", "copyright", "credits" or "license" for more information.
>>> import pyspark
>>>
After importing pyspark, we can start a Spark session:
>>> from pyspark.sql import SparkSession
>>> spark = SparkSession.builder.appName('enlistq').getOrCreate()
We are now ready to work with Apache Spark. For example, we can load a csv file in-memory:
>>> df = spark.read.csv('test_data.csv', header=True)
>>> df.show()
+---+----------------+---------+------+
| id|            name|    title|salary|
+---+----------------+---------+------+
|  1|   Shawn Spencer|  Psychic| 80000|
|  2|   Burton Guster|Sales Rep| 85000|
|  3|   Henry Spancer|  Retired| 30000|
|  4|   Juliet O'Hara|      Cop|100000|
|  5|Carlton Lassiter|      Cop|110000|
+---+----------------+---------+------+
Step 11: Terminate EC2 instance
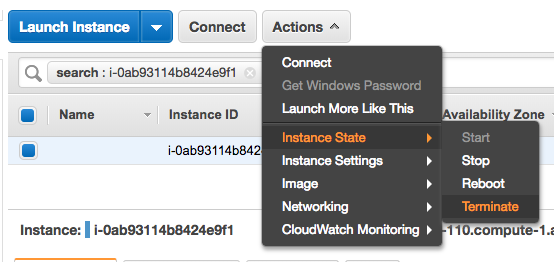
Once you are done with Spark, don’t forget to terminate the EC2 instance. While it’s free, there is a time limit to it so it’s better to terminate the session once you are finished. You can do that by going to your instance page on AWS and selecting Actions->Instance State->Terminate.
I hope you found this tutorial useful. In the next few weeks and months, you will be seeing more Spark related posts. Let me know if you have any questions. and have fun with Spark!